Sign In | Join Free | My himfr.com |
|
Ask Lasest Price | |
Brand Name : | Kule |
Model Number : | KL-69575 |
Certification : | CE, EN14960, SGS |
Price : | negotiable |
Payment Terms : | T/T |
Supply Ability : | 1 piece per 7 days |
Delivery Time : | 7-10 days |
Inflatable Play Castle
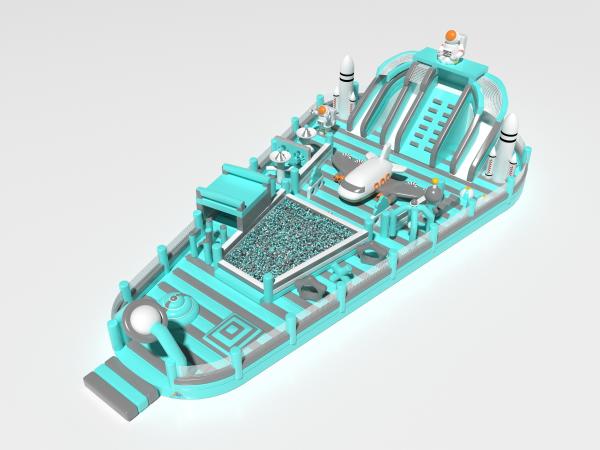
This image depicts a brightly colored and uniquely designed
inflatable playground equipment. Dominated by shades of blue-green
and white, it exudes a fresh and vibrant atmosphere. The playground
is not only equipped with a variety of entertainment options but
also incorporates a space exploration theme, making it highly
suitable for stimulating children's imagination and creativity.
The highlight of the playground is the large slide at the top,
which is moderately tall to ensure both fun and safety for the
children. Adjacent to the slide are small rocket-shaped climbing
frames that add an extra layer of fun, allowing kids to engage in
space exploration-themed play.
In the middle section, a large ball pit serves as a sea of joy
where children can play freely, interact with friends, and improve
their physical coordination. Next to the ball pit, a small airplane
model attracts attention. It serves not only as a decoration but
also as a great spot for children's role-playing games.
Additionally, the playground features several climbing structures
of varying heights. These cleverly designed structures cater to
children's climbing and jumping needs while ensuring their safety.
The climbing area is an excellent place for kids to build courage
and strength.
Decorated with astronaut figures throughout, the playground
enhances its space theme and also sparks children's interest in
astronauts and space exploration.
Lastly, the entrance and exit of the playground are thoughtfully
designed. The round entrance at the bottom and the stair-shaped
exit facilitate easy access for children, ensuring the safety and
order of the playground.
Overall, this inflatable playground equipment offers a wealth of
entertainment options, and its unique space-themed design is highly
appealing. It is an ideal place for children to play and learn.
Specifications:
Material | PVC Tarpaulin |
Size | 24.5*8*6.3m or Customize |
Color | As the picture shown or customized |
Printing | Drawing printing |
Package | Strong PVC bag for inflatables, carton for blower |
Accessories | Blower, repair kit (spare material and glue) |
Blower | CE:220-240V UL: 110-115V |
OEM | available |
Workmanship | Double Stitching |
Certificates | CE, SGS, EN14960 |
Set uptime | About 10 mins, depend on the Amusement park size |
MOQ | 1 Piece |
Payment | T/T, 30% deposit and 70% balance when shipment |
Shipment | By sea, by air or by express |
Warranty | 2 years |
Application | Outdoor and indoor amusement for kids and adults |
The inflatable castle is a happy castle for children. It stands in a corner of the park like a shining dream castle. The appearance of the castle is colorful and full of vitality. Children excitedly run into the castle and start their journey of joy. There is spacious space inside the castle. Children can run, jump, and play freely inside. The slide is one of the children's favorite items. They slide down from the high slide, and laughter echoes in the air. In addition, there are many lovely cartoon decorations in the castle, making children seem to be in a fairy tale world. The inflatable castle not only brings happiness to children but also allows them to exercise their bodies and enhance their self-confidence while playing. Parents feel extremely happy when looking at the happy smiles on their children's faces.
FAQ
Q: How to repair when damage?
A:
Step 1: Identify the Damage
Thoroughly inspect the inflatable to locate any tears, punctures,
or leaks.
Step 2: Clean and Dry the Area
Clean the damaged area with mild soap and water to remove dirt or
debris. Allow the area to dry completely before proceeding with the
repair.
Step 3: Patch the Damage
Apply a patch specifically designed for inflatable repairs over the
damaged area. Make sure the patch is slightly larger than the
damaged area to ensure proper coverage. Press the patch firmly onto
the surface, smoothing out any wrinkles or air bubbles.
Step 4: Apply Adhesive
If using a patch that requires adhesive, apply a thin, even layer
of adhesive to both the patch and the inflatable surface. Allow the
adhesive to become tacky before pressing the patch onto the
surface.
Step 5: Allow Time to Cure/Allow the Adhesive to Dry
Once the patch is in place, you'll need to allow the adhesive to
dry completely. This may take several hours, depending on the type
of adhesive you are using. It's important to avoid using the
inflatable until the adhesive is completely dry, as this could
cause the patch to come loose. Wait at least 1 hour before
inflating again.
Step 6: Test the Repair
Once the patch has cured, inflate the inflatable and check for any
signs of leakage. If the repair holds, the inflatable is ready to
be used again.
It's important to use repair materials specifically designed for inflatables and follow the manufacturer's instructions carefully to ensure a successful repair. If the damage is extensive or beyond your ability to repair, consider seeking professional assistance.
-
Q: Accessories included?
A: Free accessories include Storage Bag / Repair Kit / Warning
Label / Custom Logo
![]() |